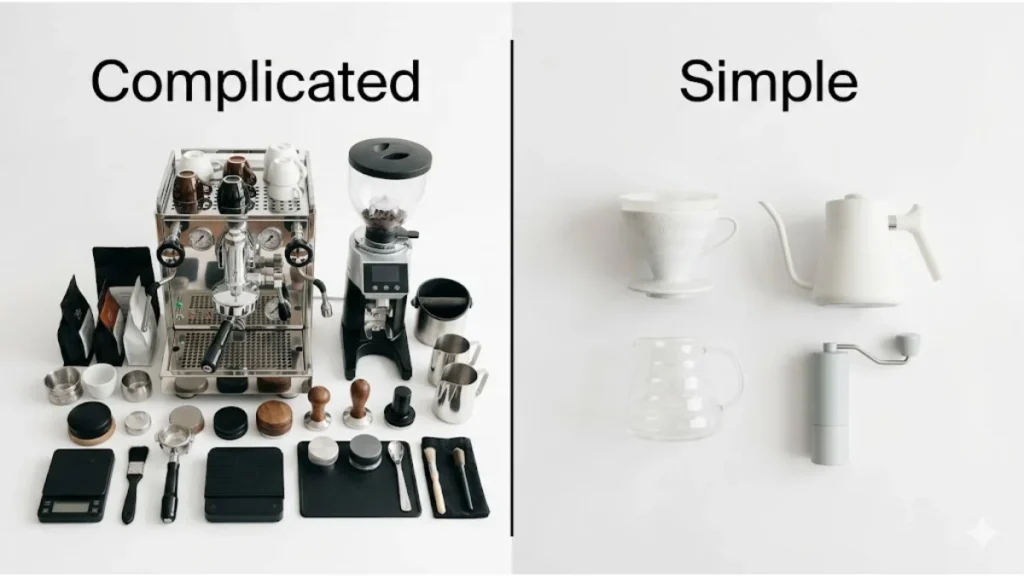
Most beginners think making café-quality coffee at home requires a $500 espresso machine.
It doesn’t.
In reality, the biggest improvement comes from three simple things:
- grinding fresh beans properly,
- measuring accurately,
- and controlling your pour.
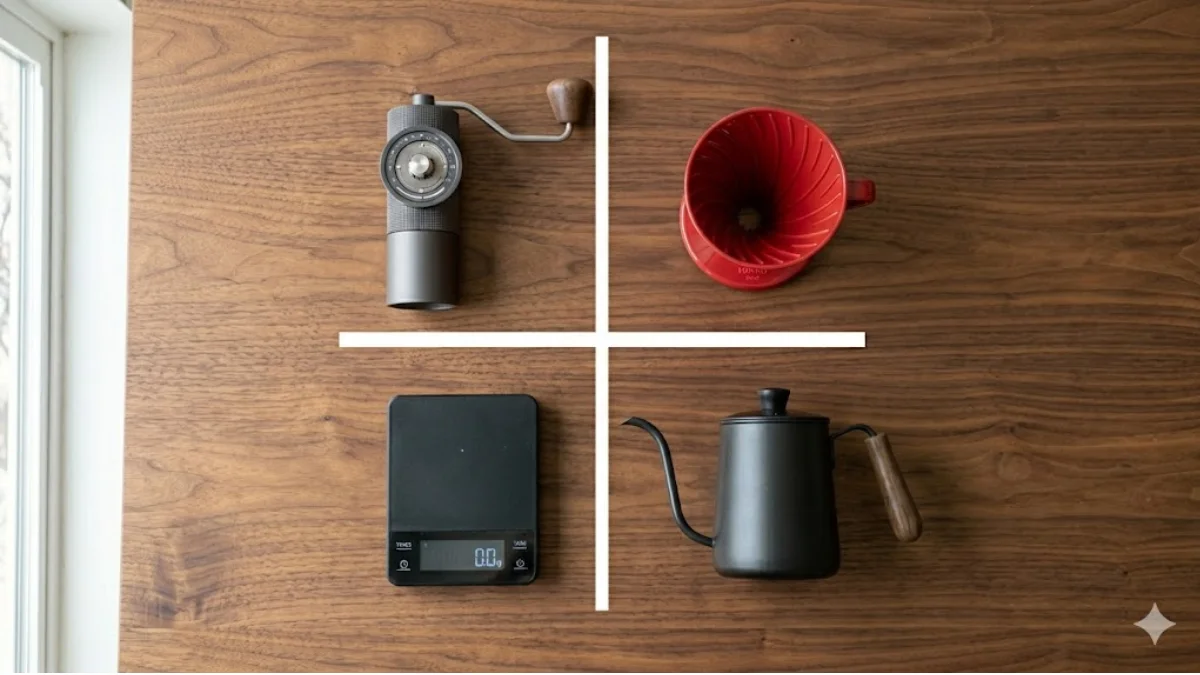
That’s why the best beginner coffee setup under $100 in 2026 focuses on four affordable tools:
- a burr grinder,
- a pour-over dripper,
- a digital coffee scale,
- and a kettle you may already own.
With the right setup, even a complete beginner can brew coffee that tastes cleaner, sweeter, and fresher than many café cups — without complicated equipment or advanced barista skills.
Key Takeaways
- A burr grinder matters more than an expensive brewer
- You can build an excellent coffee setup for under $100
- Start with grinder + dripper + scale before upgrading kettles
- The Hario V60 Plastic 02 is one of the best-value brewers available
- Fresh beans and accurate ratios improve coffee more than expensive gear
Quick Answer
The best beginner coffee setup under $100 is:
| Tool | Best Beginner Pick | Approx. Price |
|---|---|---|
| Grinder | TIMEMORE Chestnut C3 | ~$45 |
| Brewer | Hario V60 Plastic 02 | ~$10 |
| Scale | Greater Goods Coffee Scale | ~$25 |
| Kettle | Any existing kettle to start | ~$0 |
Total: Around $80–$90 before filters.
If your budget allows later, upgrade to a gooseneck kettle like the COSORI Electric Gooseneck for easier pour control and more consistent brewing.
Already familiar with pour over basics? Jump straight to our Pour Over Coffee Guide for the full technique.
Bottom Line: This four-piece setup removes the biggest variables in home coffee brewing — grind inconsistency, guesswork ratios, and water temperature — at a price that most beginners can justify without hesitation.Best Beginner Coffee Setup Under $100 (Quick Picks)
| Category | Product | Why It’s Best for Beginners | Price |
|---|---|---|---|
| Best Grinder | TIMEMORE Chestnut C3 | Excellent grind consistency for the price | ~$45 |
| Best Brewer | Hario V60 Plastic 02 | Cheap, durable, widely used, beginner-friendly | ~$10 |
| Best Scale | Greater Goods Coffee Scale | Accurate, easy to use, built-in timer | ~$25 |
| Best Upgrade Kettle | COSORI Electric Gooseneck | Easier pouring + temperature presets | ~$60 |
| Best Budget Kettle | Use your existing kettle | Saves money while learning | ~$0 |
Best Budget Combination Under $100
- TIMEMORE C3 grinder
- Hario V60 Plastic 02
- Greater Goods Scale
- V60 paper filters
- Existing home kettle
Estimated total: ~$88
That setup alone is enough to make dramatically better coffee than most beginner supermarket setups.
Who This Beginner Coffee Setup Is Best For
This setup is ideal if you:
- are completely new to home coffee brewing,
- want better coffee without buying an espresso machine,
- prefer simple equipment over complicated gadgets,
- want the best coffee gear under $100,
- or want a setup that can grow with your skills later.
It may not be ideal if:
- you only drink espresso-based milk drinks,
- want one-button convenience,
- or brew coffee for large groups every morning.
For most beginners, however, this setup delivers the best balance of:
- price,
- flavour,
- simplicity,
- and long-term upgrade potential.
Why Four Tools — and Not More
The most common beginner mistake isn’t buying the wrong gear. It’s buying too much of it, or buying it in the wrong order.
Here is the honest priority hierarchy for home coffee brewing:
1. Grinder — the single most impactful purchase you can make. A consistent burr grinder transforms cup quality more than any other variable. If you can only buy one thing, buy this.
2. Brewer — the method matters less than most people think. The V60 is inexpensive, widely used, and produces excellent results once you learn the technique. A $10 plastic V60 produces cups that rival those from drippers ten times its price.
3. Scale — brewing by weight instead of volume is the fastest way to make your results repeatable. A $25 scale eliminates the biggest daily inconsistency in home brewing.
4. Kettle — a gooseneck kettle controls how you pour and, in the electric version, the temperature of your water. It’s a meaningful upgrade for pour over. It’s also the most optional of the four — a standard kettle works while you build the habit.
Everything else — a server, a thermometer, a brush, a dedicated coffee storage canister — is genuinely optional for beginners. Start with these four and build from there.
What Makes the Biggest Difference in Coffee Quality?
For beginners, the biggest improvements come in this order:
- Freshly grinding whole beans
- Using a burr grinder instead of a blade grinder
- Measuring coffee and water by weight
- Brewing with the correct water temperature
- Using fresh coffee beans with a roast date
The brewer itself matters less than most beginners think.
A $10 V60 with fresh-ground beans will usually outperform an expensive brewer paired with stale pre-ground coffee.
This is why this guide prioritizes the grinder first.
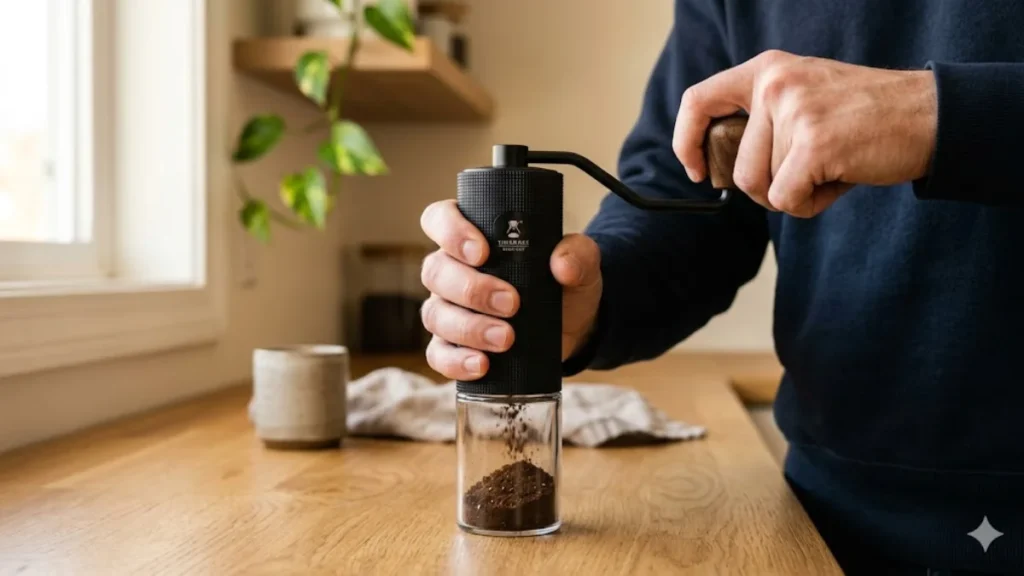
Tool 1 — Grinder: TIMEMORE Chestnut C3
Key Takeaways
- Fresh beans and accurate ratios improve coffee more than expensive gear
- A burr grinder matters more than an expensive brewer
- You can build an excellent coffee setup for under $100
- Start with grinder + dripper + scale before upgrading kettles
The Hario V60 Plastic 02 is one of the best-value brewers available
| Spec | Detail |
|---|---|
| Burr type | S2C conical stainless steel |
| Body | All-metal aluminium alloy |
| Capacity | 25g |
| Grind range | Espresso to French press |
| Adjustment | Internal stepped |
| Weight | ~530g |
| Price | ~$45 |
Amazon: TIMEMORE Chestnut C3
👉 For a deeper look at what makes a good burr grinder and how to choose between manual and electric options, visit our Coffee Grinder Hub.
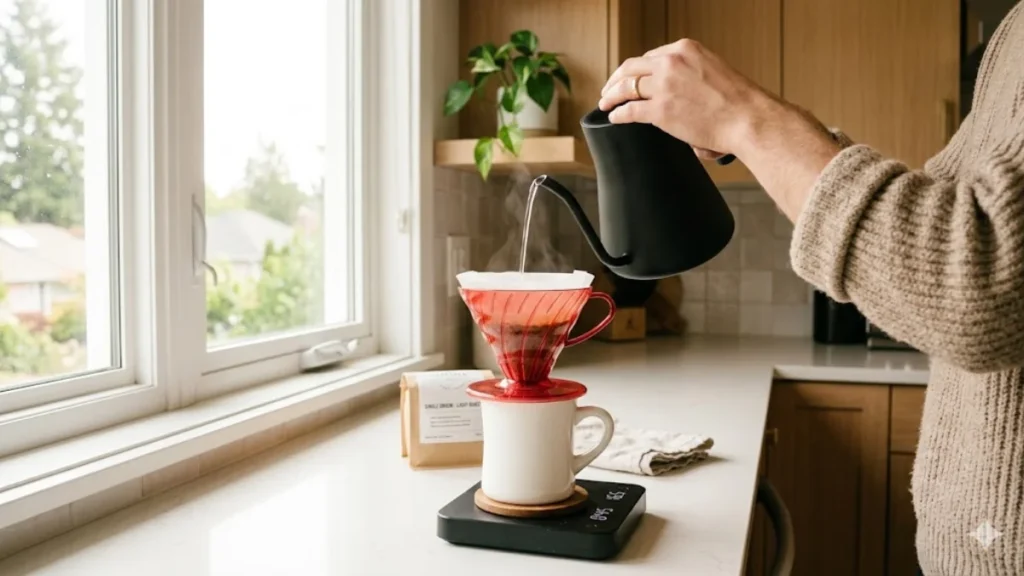
TOOL 2 — BREWER: Hario V60 Plastic Dripper (Size 02)
Price: ~$10 | View on Amazon
At roughly $10, the Hario V60 Plastic Dripper is one of the best value purchases in home coffee. Used by barista champions and everyday home brewers alike — and it costs less than a café cappuccino.
Why Plastic — Not Ceramic or Glass?
Beginners often assume ceramic or glass V60S are superior. They feel more premium. But for brewing, plastic actually performs better for beginners.
Here’s why:
- Heat retention — plastic walls don’t absorb heat from the water the way ceramic does
- Consistency — beginners who skip preheating get more stable results with plastic
- Durability — plastic is shatterproof, ceramic isn’t
💡 Beginner Tip: Save the ceramic or copper V60 for later — as an aesthetic upgrade, not a performance one. The cup quality is identical.
Why Size 02?
The V60 comes in three sizes. Size 02 is the right choice for most beginners.
- 01 — single cup only (1 cup max)
- 02 — standard size, brews 1 to 4 cups (15g to 30g coffee)
- 03 — large batch, up to 6 cups
Start with the 02. It grows with you.
How the V60 Works
The V60’s cone shape and single large drain hole give you full control over extraction:
- Grind coarser → water drains faster → lighter extraction
- Grind finer → water slows down → fuller extraction
- Spiral ridges on the interior wall keep the filter off the sides — this allows airflow and keeps extraction even
The honest trade-off:
The V60 is the most technique-sensitive among common pour-over drippers. It rewards practice. But it also reveals the true character of good beans more clearly than almost any other brewer.
⬛ Bottom Line: The V60 is the most expressive manual brewer at any price. The $10 plastic version is where most specialty coffee journeys begin — and many never outgrow it.
A Note on Filters
👉 Filter cost not included in setup total. Hario V60 paper filters cost ~$7–$9 for 100. They're sold separately and widely available on Amazon. Factor this into your budget before ordering.TOOL 3 — SCALE: Greater Goods Coffee Scale with Timer
Price: ~$25 | View on Amazon
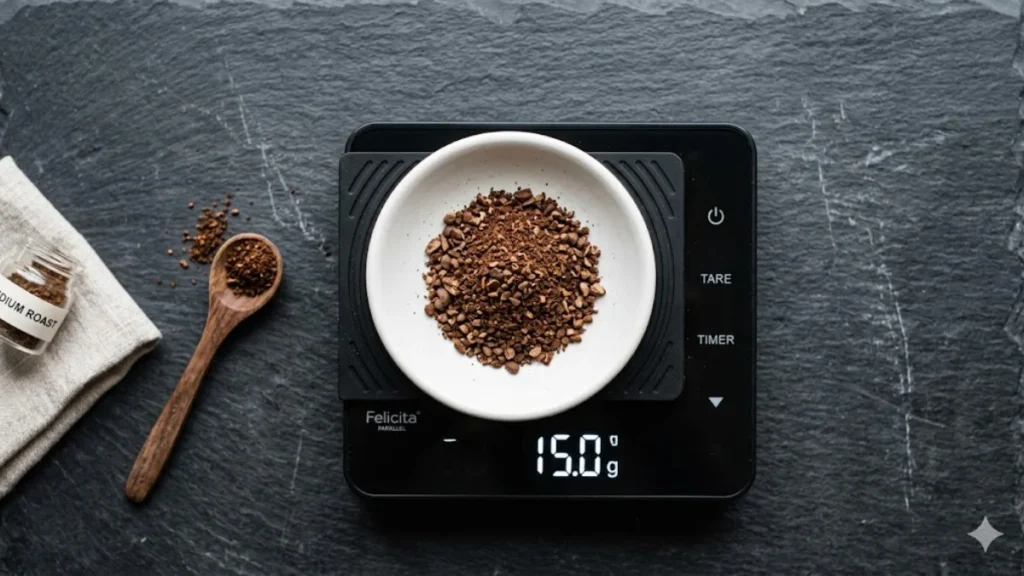
Why You Need a Scale (Not a Scoop)
Measuring coffee by volume — a tablespoon, a scoop — is the fastest route to inconsistency.
Here’s the problem:
- A tablespoon of finely ground coffee weighs more than a tablespoon of coarsely ground coffee
- The same scoop gives a different dose every single morning
- Grams don’t lie. Tablespoons do.
💡 Beginner Tip: Once you find a ratio you like — typically 1:15 or 1:16 (coffee to water by weight) — a scale lets you hit it precisely every morning. Without one, you're approximating. With one, you're brewing.Why the Greater Goods Scale?
It’s already been reviewed in depth on RoastVista — and it clearly earns its place in this setup.
What it does well:
- 0.1g precision — accurate enough for pour-over dose and water measurement
- Built-in timer — no separate phone timer needed for bloom and brew time
- 3kg capacity — handles a full Chemex or French press on the platform
- Waterproof silicone cover — protects the electronics from inevitable coffee spills
- One-button tare, one-button timer — no learning curve
Known Limitation
Some users report a slight lag during very fast pours.
For pour over brewing — where you pour slowly and deliberately — this is a non-issue. Worth knowing if you eventually move toward espresso.
⬛ Bottom Line: The Greater Goods does everything a beginner needs at a quarter of the price of smart scales like the Acaia. Start here.📖 Read our full review: Greater Goods Coffee Scale Review
TOOL 4 — KETTLE: Two Options Depending on Your Budget
A gooseneck kettle’s narrow, curved spout makes slow, controlled pours possible.
Without one: water hits the grounds too fast, too broadly — uneven saturation, unpredictable extraction.
With one: the bloom is easy to execute, the main pour is consistent, and the cup improves immediately.
There are two honest options here.
Option A: COSORI Electric Gooseneck (~$60) — Recommended
Why it’s the recommended pick:
- 5 one-touch temperature presets — removes the most common beginner mistake (water too hot)
- 60-minute keep-warm mode — water stays at temperature while you grind
- Narrow gooseneck spout — makes the bloom and main pour noticeably easier
- 100% food-grade stainless steel interior — no plastic contact with water
💡 Beginner Tip: Press the pour over preset, wait for the beep, and pour. Temperature is no longer something you need to think about.The honest trade-off:
At ~$60, the COSORI pushes the total setup over $100 when combined with the other three tools.
👉 If your budget is strict: Use whatever kettle you already own. Add the COSORI when you're ready. The grinder, dripper, and scale do the heavy lifting.| Spec | Detail |
|---|---|
| Type | Electric |
| Capacity | 0.8L |
| Temperature | 5 presets (104°F–212°F) |
| Keep-warm | 60 minutes |
| Interior | Food-grade stainless steel |
| Price | ~$60 |
Option B: Hario Buono Stovetop (~$40) — Budget Alternative
The Hario Buono is the industry-standard stovetop gooseneck kettle — used in specialty coffee shops worldwide for decades.
What it offers:
- One of the most controlled pours of any stovetop kettle
- 1.0L capacity — larger than the COSORI, better for multi-cup brewing
- No electronics — nothing to fail, lasts decades
- Induction compatible (most models)
What it doesn’t have:
- No temperature display
- No keep-warm function
- Requires a thermometer or the boil-and-wait method
💡 Beginner Tip: Bring to a full boil, rest for 60–90 seconds, and pour. That gives you approximately 93°C–95°C — the right range for most medium roasts. Pair with a $10 instant-read thermometer for more precision.
⬛ Bottom Line: Paired with a thermometer, the Buono delivers 90% of the electric experience at 65% of the COSORI's price. Best for budget-conscious brewers who don't mind a small extra step.| Spec | Detail |
|---|---|
| Type | Stovetop |
| Capacity | 1.0L |
| Temperature | No display (thermometer required) |
| Material | Stainless steel |
| Induction | Yes (most models) |
| Price | ~$40 |
The Honest $100 Path
⬛ Bottom Line Box
Buy the grinder ($45) + dripper ($10) + scale ($25) + V60 filters ($8) = $88 total.
Use whatever kettle you already own. This three-tool setup alone produces dramatically better coffee than any blade-grinder setup.
Add the COSORI or Buono when your budget allows — it’s the right next step, not a day-one requirement.
What You Don’t Need (Yet)
The home coffee market is full of products designed to solve problems you don’t have yet.
Skip these as a beginner:
❌ Espresso machine
Espresso demands months of technique development — precise grind, pressure control, temperature management. It’s also expensive to do properly.
Start with pour over. Build your palate first.
❌ Expensive ceramic or copper V60
The $10 plastic V60 produces the same cup as the $45 copper version.
Material affects heat retention only marginally when your technique is consistent. Buy the premium version later — as an aesthetic upgrade, not a performance one.
❌ Smart scale (Acaia, Fellow Tally)
These are excellent tools — but for advanced brewers who need app connectivity and flow rate monitoring.
The Greater Goods does everything you need at a quarter of the price.
❌ Electric grinder (yet)
The Baratza Encore (~$130–$145) is a worthy upgrade. But the TIMEMORE C3 produces comparable results for filter brewing at less than a third of the price.
💡 Upgrade the grinder when you've outgrown the manual experience — not before.❌ Coffee storage canister
Useful — but not urgent. A resealed bag stored away from light and heat is perfectly adequate while you establish your routine.
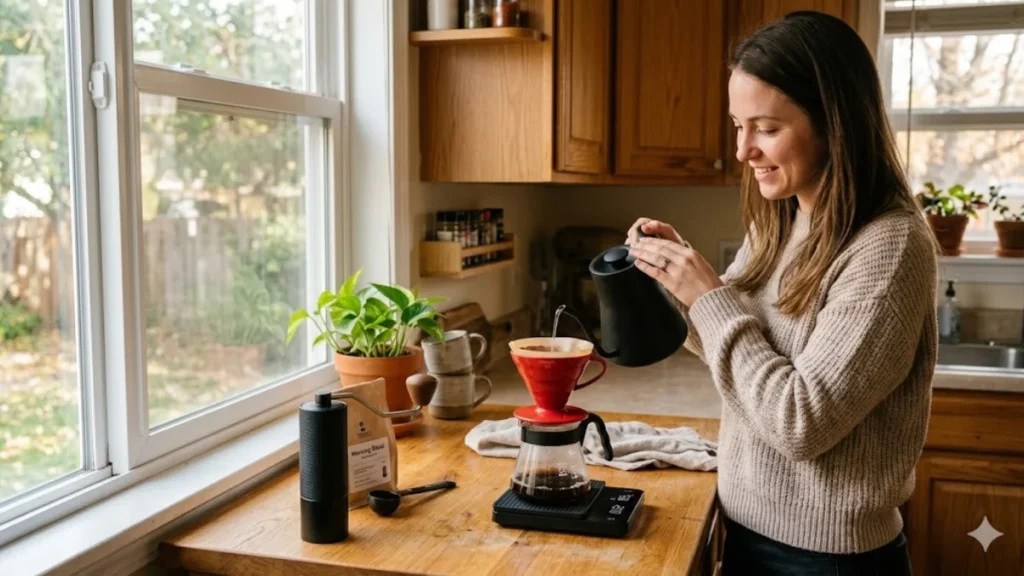
Your First Brew: Step-by-step
Once your setup arrives, here’s how to use it for the first time.
Makes: 1 cup | Coffee: 15g | Water: 240g | Target brew time: 2:30–3:30
Step 1 — Heat your water
- COSORI: press the pour over preset, wait for the beep
- Buono: bring to a full boil, rest for 60–90 seconds
Target: 93°C–95°C
Step 2 — Rinse your filter
Place the V60 filter in the dripper. Set the V60 on your mug.
Pour hot water through the filter — this removes papery taste and preheats the dripper and mug. Discard the rinse water.
💡 Beginner Tip: Never skip the rinse. Even a small papery taste is noticeable in the final cup.Step 3 — Grind your coffee
Weigh out 15g of whole beans on your scale. Grind to medium — roughly the texture of coarse sand.
For the TIMEMORE C3: start at approximately 20 clicks from closed as your V60 starting point.
Step 4 — Add and level
Add grounds to the filter. Tap the dripper gently to level the coffee bed.
Step 5 — Tare the scale
Place the V60-on-mug setup on the scale. Press tare to zero it out.
Step 6 — Bloom
Start your timer. Pour 30g of water slowly in a spiral from centre to edge.
Wait 30–45 seconds. You’ll see the grounds swell and bubble — CO₂ releasing from fresh beans. This is a good sign.
Step 7 — Main pour
At 45 seconds, continue pouring in slow spirals until you reach a total of 240g of water.
Keep the pour gentle and even. Total brew time: 2:30 to 3:30.
Step 8 — Taste and adjust
| Taste | Cause | Fix |
|---|---|---|
| Sour or weak | Under-extracted | Grind finer next time |
| Bitter or harsh | Over-extracted | Grind coarser next time |
| Flat or hollow | Stale beans | Buy fresher coffee |
💡 Beginner Tip: Change one variable at a time. If you adjust grind AND ratio AND temperature in the same brew, you won't know what fixed it.📖 For a full breakdown of ratio, temperature, and pour technique: Coffee Brewing Ratio Guide
Your Upgrade Path
Brewing consistently for a few weeks? Here’s what to buy next — in priority order.
Upgrade 1 — Better grinder (most impactful)
Move from the TIMEMORE C3 to the TIMEMORE C2 MAX — already reviewed on RoastVista.
When budget grows further: the Comandante C40 MK4 is the premium destination.
Grind quality is the ceiling on your cup quality. Upgrade the grinder before anything else.Upgrade 2 — Gooseneck kettle (if still using a standard kettle)
The COSORI Electric Gooseneck is the right next step. Temperature control and pour precision — in one tool, under $65.
Upgrade 3 — Second brew method
Once pour-over feels natural, add a French press or an AeroPress for variety. Both cost under $30 for solid beginner-friendly models.
Upgrade 4 — Better beans
The biggest quality jump often isn’t gear — it’s coffee.
Buy from a specialty roaster. Look for a roast date on the bag (ideally within the last 30 days). Single-origin Ethiopian or Colombian medium roasts are great starting points.
📖 For grinder options at every price point: Coffee Grinder Hub
Beginner Tips: Getting the Most From This Setup
💧 Use filtered water
Tap water with high mineral content or chlorine content noticeably affects taste. A simple Brita jug is enough.
📅 Buy beans with a roast date
Avoid supermarket coffee without a roast date. Freshness matters more than brand. Aim to brew within 30 days of the roast date.
🟤 Start with medium roast
Medium roast is the most forgiving. Light roast punishes imperfect technique. Dark roast over-extracts easily. Medium gives you the best results while you’re learning.
📝 Record your first good recipe
Write down your dose, grind setting, water weight, and brew time after your first decent cup. Repeatability is the goal — you can’t improve what you can’t repeat.
🧹 Clean your grinder weekly
A grinder brush costs under $5. Stale retained grounds from the previous brew affect your next cup more than most beginners expect.
🌡️ Preheat everything
Mug, dripper, and server. Heat loss at the start of extraction drops your brew temperature before the grounds even get wet — and affects the final cup noticeably.
Frequently Asked Questions
Can you make good coffee at home for under $100?
Yes. A quality burr grinder, a simple pour-over dripper, and a digital scale are enough to make excellent coffee at home for under $100. Fresh grinding and accurate brewing matter far more than expensive equipment.
What is the most important coffee tool for beginners?
The grinder.
The grinder.
A burr grinder improves coffee quality more than any other piece of equipment because it creates evenly sized grounds for balanced extraction. Even an inexpensive brewer performs well when paired with a good grinder.
Is a gooseneck kettle necessary for pour over coffee?
No — not at the beginning.
A gooseneck kettle improves pouring control and consistency, but beginners can absolutely start with a standard kitchen kettle and upgrade later.
Why is a burr grinder better than a blade grinder?
A burr grinder produces uniform coffee particles, while a blade grinder creates uneven chunks and powder.
That unevenness causes both over-extraction and under-extraction in the same cup, making coffee taste bitter, sour, or muddy.
Is the Hario V60 good for beginners?
Yes.
The Hario V60 is inexpensive, widely available, and capable of producing excellent coffee once you learn the basic pouring technique. The plastic V60 is especially beginner-friendly because it retains heat well and is durable.
Should beginners buy an espresso machine first?
Usually no.
Espresso machines are expensive and require far more grind precision, technique, and maintenance. Pour-over brewing is simpler, cheaper, and helps beginners learn extraction fundamentals more easily.
What coffee beans should beginners start with?
Medium roast whole beans from a specialty roaster are usually the safest starting point.
They are more forgiving than very light or very dark roasts and tend to produce balanced sweetness and acidity with beginner brewing techniques.
Conclusion: The Best Beginner Coffee Setup Is Simpler Than Most People Think
You do not need expensive equipment to make genuinely great coffee at home.
For most beginners, the biggest improvements come from:
- grinding fresh beans,
- measuring accurately,
- and brewing consistently.
That is why the best beginner coffee setup under $100 starts with:
- the TIMEMORE Chestnut C3 grinder,
- the Hario V60 Plastic 02,
- and a simple digital coffee scale.
Those three tools alone can produce cleaner, sweeter, and more balanced coffee than many café cups costing $5–$7 each.
Start simple. Learn the fundamentals. Upgrade slowly.
A better grinder, a gooseneck kettle, or premium beans will always matter more than buying flashy equipment too early.
Ready to learn the full pour over technique? Start with our Pour Over Coffee Guide. To understand how grind size affects your cup, visit our Coffee Grind Size Chart. When you’re ready to understand ratios, our Coffee Brewing Ratio Guide covers everything you need.
Our Research & Selection Standards
We do not claim hands-on testing for every product featured on this site. Instead, our recommendations are based on detailed research across manufacturer specifications, professional barista resources, trusted coffee communities, and large volumes of verified customer feedback. We focus on practical, beginner-friendly guidance designed to help readers avoid overpriced or unnecessary gear.
.